Showing posts with label how to paint watercolor. Show all posts

Wednesday, February 9, 2011

Bicycle Shadows

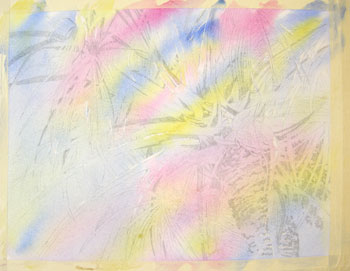
Introducing "Bicycle Shadows", one of my latest works. It was created on a half sheet of Arches 140 pound paper. This piece, as most of my latest work, was "poured".
A friend recently suggested that I come up with a different name for my process than "poured", as I don't really pour the paint. To create these works I use a value scale of 1 through 6, 1 being white and six being the closest color to black I can create from the colors on my palette.
I first create the drawing, trace the pencil sketch and then do a value study in various shades of gray and black marker. Then I transfer the drawing to my watercolor paper and mask the white areas. At this point I wet the entire sheet of paper with a puddle of water and allow it to soak in for a few minutes. Then, using a large round brush, either 14 or 16, I dip into the paint on my palette and dribble and stroke it gently onto the very wet paper. I use three primary colors for each application: my favorites are New Gamboge, Quinacridone Magenta, and French Ultramarine Blue. I apply the colors next to one another, not directly on top of one another, then I tip the board that holds my paper (I tape the paper to a foam core board with 2-inch masking tape) and I allow the colors to gently blend a little. The first application provides the 2 and 3 levels of value on my painting.
As I proceed through the painting I allow this to dry completely - usually overnight. Then, I mask the level two and three values that I want to save, and again wet the paper and apply the pigments. Each time I apply stronger and stronger pigments, never brushing to disturb the layers of paint below. I continue on with the process: dry, apply masking, wet the paper, apply the pigment. This continues until I reach those darkest values of deep color.
It's a fun, messy, and time-consuming process that produces colors and glow that I have not been able to achieve in any other manner.
If you have any ideas for a name for this technique I would love to hear them. My husband and I will go over the suggestions and if we pick yours, I will send you a small print of one of my paintings using this technique!
I would love to hear from you!

Tuesday, June 29, 2010

Palm Tree Wet In Wet Technique

I have applied another wash. After this dries I will add more masking to save the next level of values! Lots of work, lots of patience, lots of results!!!

You can follow me on Facebook!
To learn more about my classes visit my website:
http://watercolorworksart.com/Classes.htm

Monday, June 28, 2010

Palm Tree Wet In Wet Technique

After the first wash dries completely - what I call "bone dry", I then mask the next light values to save. Here you can see the masking. It's okay to use masking tape, or frisket film, but I find that they leave funny edges when the masking is removed, so I stick with brushing on the masking fluid.
So the first masking was to save the absolute whites of the paper. This masking application is to save the value 2 areas. I use a value chart from one to six, one being white and six being black. Each number represents a paint application. So, each stage of the painting is masked to save the next layer of color and value.

Monday, June 21, 2010

First Mask and Wash on Palm

The first thing I did was to apply masking fluid to the absolute whites that I wanted to save. After the masking was completely dry I wet the paper gently with clear water and a 2 inch soft brush. I apply a lot of water so that it puddles on the paper. Then I tip the board back and forth to keep the liquid flowing in all directions so that the paper absorbs the water evenly.

Once the water has soaked into the paper, has lost most of the "puddle" and simply looks shiny, I add the three primary colors. I don't blend them with my brush, I simply drop then onto areas of the paper, tipping the board, allowing gravity and the wetness of the paper and pigments to softly blend the edges. I want to keep this relatively light as these colors will represent the second lightest values in my painting. They will also act as underpainting for the next few washes. This will dry quite a bit lighter than it looks when applied.

Now this has to dry completely - bone dry - before I can work on it again.
More to come....

Saturday, June 12, 2010

Palm Tree Wet In Wet Technique

Okay, I finally have a few progress photos of the palm tree to show you. You can see my sketch book on the right, my reference photo at the top, my masking fluid on the top right, and a small pencil. At this point I have created a drawing in my sketchbook. I then trace the loose sketch create a value study in only three or four values. I do this with a set of black and gray markers. I use the white of the paper to indicate the lightest values.


This value study will help me to determine where to mask areas before color is added.


These preparatory steps take some time, but the extra time is worth it with the beautiful end results that I can achieve!

Once I have these steps completed I enlarge the value study and use graphite to trace it onto my full sheet of watercolor paper.

Because I will be painting very wet, I use two inch masking tape to secure my paper to a foam core board. This will help to keep it relatively flat while painting and it will pull it flat again as it dries.

More to come soon on this painting...

Monday, January 4, 2010

Cactus Flower Lesson 14


Ta-da! The final piece. I used another glaze of Prussian on the shadow at lower left just to help make the warm flower pop.

You can paint along with this lesson! Many of my students like to print the daily lessons, then go to my etsy shop and click on the Online Lesson icon to order the photo references and drawing ($5), which come in an email and can be printed from your computer.

If you enjoyed this lesson, please let me know. I will try to post another lesson soon.

If you are interested in purchasing this piece, please email me at: debbie@watercolorworksart.com

Wednesday, December 30, 2009

Cactus Flower Lesson 12


Oh what fun! Developing the red flower heads was lots of fun. I love how the greens and red act against each other and really make the focal point pop. The dark values in the shadow areas help to create the illusion of depth.

I used many different reds on my palette to work around the flower heads including, Burnt Sienna, Perylene Maroon, Permanent Rose, and some Quinicridone colors. I wanted to keep the yellows glowing through some areas, so I was careful not to cover them with too many glazes or with cool glazes.

I used some Burnt Sienna and VanDyke Brown in the shadow areas around the thorns. Be sure to leave the white areas wherever you can! This just adds sparkle to the piece.

Tuesday, December 29, 2009

Cactus Flower Lesson 11


The shadows are even deeper now, as I have added another glaze of Perylene Green, mostly on the right and under the flower heads.

The dark shadow works like an arrow to carry the viewer's eye to the focal point.


I played with different applications of colors to create some textures in the warm shadow area to the left and under the flower heads. I am enjoying the shapes that are emerging from this piece!

Monday, December 28, 2009

Cactus Flower Lesson 10

Back to the Cactus Flower lesson!!!


Now it's time to add some depth and details.


Using Hookers Green I have glazed over some of the other greens, especially where I added shadow glazes previously.  I glazed this green over the parts of the leaves where the cool Cerulean Blue was applied earlier. Now the yellow greens in the sunlit areas begin to contrast more with the cool blue-greens of the other areas. Look at your photo reference carefully and you will see that none of the green areas can be painted exactly alike because the light hits each leaf differently and each leaf has a small shift in color from the others.

I have also used VanDyke Brown in a richer mixture than before and developed some details in the lower left area of the painting. This area in the reference had some woody growth, and I wanted to capture a bit of that. I also liked how it warmed up that corner of the painting.

I have worked around the painting adding small touches and glazes for depth and interest.

To see more of this lesson, please visit earlier posts.

Tuesday, December 22, 2009

Cactus Flower Lesson 8


Now that I have my shadows developing nicely, I want to give them another glaze of a nice dark Perylene Green.

This is a gorgeous color that looks like a pine green to me. It has a bit of warmth to it, and it glazes nicely.

Now the shadow areas really have some punch. Notice the soft edges where the cactus leaves have soft, flowing nooks and crannies. I have applied the Softened Edge Stroke to the areas where there is a clear edge and to the edges of cast shadows. If you hold it away from you, you will begin to see the illusion of depth and perspective! This also makes the flower heads really POP!

It is really important to step away from your work occasionally and get a fresh perspective. I like to take the piece and stand in front of a mirror, or set it up in a different room where I can get about 10 - 15 feet away from it. Sometimes I turn the piece upside down to get a fresh look at the composition and to see more objectively how the piece is coming together!

Sunday, December 20, 2009

Cactus Flower Lesson 6


Be sure that all previous applications of paint have thoroughly dried.

Next, I have used Burnt Sienna to warm some areas an add the under-painting for some of my shadows. This application of paint should be very wet. Don't brush too much over previously painted areas or you will dig up and stir up the pigment layers. Try to apply the wet paint for each layer or glaze with a very light touch, and quickly drop it in. Your brush should just push the puddles of wet paint around. It should barely even touch the paper, if at all. Using a delicate touch will preserve the previous glazes of color and each glaze will stay fresh and clean.

You can view previous posts to see the beginning of this lesson. Just click on the archives at the left of this page.

Saturday, December 19, 2009

Cactus Flower Lesson 5


I want to get some more of the flower heads established in this piece, since the flowers are my focal point. I have used Winsor Red and Quinicridone Magenta to develop some of these areas. Just as I described yesterday, vary your edges from crisp to soft. Soft transitions are made with water pushed into the stroke before it dries. Crisp edges are made by directly applying pigment to the dry paper and leaving it alone.

Let your photo reference be your guide. Look for crisp edges that can be painted directly, and then look for areas which would be appropriate for that Softened Edge Stroke (see previous post).

I have also added some more Permanent Sap Green and Hookers Green to areas of the plant that have not yet been developed. In the area on the right of my image I used a little wet-in-wet technique by laying in a wet wash of Sap Green, then dropping in Hookers Green where I wanted to add soft shadows.

Friday, December 18, 2009

Cactus Flower Lesson 4

Today I am adding some yellows.


I have used Aureolin Yellow to begin to develop the areas in the flower heads that will become yellow-orange. Be careful where you apply colors - they should not go EVERYWHERE! Soften some edges by pulling water into the stroke. I call this my Softened Edge Stroke.

First lay down a stroke of color, very wet, yet strong with pigment. Then, clean your brush and load it with water. Just touch the tip of your brush to your paper towel to remove excess water that may drip. Pull a stroke of water from the blank area into and alongside the stroke you just applied. It is important to do this BEFORE the stroke dries. Pulling water into the stroke will push the pigment into the area that already has color. If you pull the water from the stroke out to the blank area, the stroke will just be diluted and the pigment will wash out to the blank area. The goal is to create a very soft transition from dark color to nothing (clear water).

This takes practice. Be easy on yourself and remember that it is just a piece of paper! With practice you will master the many different techniques!

Thursday, December 17, 2009

Cactus Flower Lesson 3


In the next application of paint I used Cerulean Blue (Peacock Blue by Holbein would also be great here!).

Keep this really wet as Cerulean Blue is a very opaque color. I searched the photo reference for areas that might have a light blue cast to them. This application is an underpainting for future glazes. I have varied the values to show the textures of the plant. Wetting some areas or working with pigment that has more water creates lighter values.

Wednesday, December 16, 2009

Cactus Flower Lesson 2

It is time for the first big wash! I used a very wet mixture of Permanent Sap Green and Aureolin Yellow.

You can see how wet the application was by the little puddle of paint at the bottom of the wash area. I used this mixture around the painting to work in the preliminary green washes on the cactus leaves.


You can vary the mixture here and there as the photo reference and your preferences dictate. I used some Hookers Green in some areas where I wanted to indicate shadows.

If you would like to paint along, please visit my etsy online shop and click on the Online Class icon. For $5.00 you will receive the photo reference and drawing for this painting. I will suggest that you print each lesson/post. This makes it easier to paint along!

Tuesday, December 15, 2009

Cactus Flower Lesson 1


Okay, I must apologize for those of you who have been waiting patiently for a new lesson! It has been very busy with the holidays, guests, events at the Art and Antiques Studio and preparing for new classes coming in January. No more excuses! Here is the beginning of the new lesson!

You can follow along with this lesson each day, and if you like, you can visit my etsy shop and purchase ($5) the drawing and reference photo. I will email the references to you and then you can paint along!

First of all, the drawing must be traced onto the watercolor paper. I like to use a Chunky Graphite Stick from Cheapjoes.com. I scrub a healthy amount of graphite on the back of my drawing, wipe it a little with paper toweling, and then tape one edge of the drawing to my watercolor paper. Trace from the right side of the drawing. Don't press hard or you will leave indentations on your paper and the pigments will puddle into these grooves and cause unsightly marks.

Now, tape your watercolor paper onto a foam core board or gator board that is at least an inch or two larger all the way around. I like to use two-inch Scotch masking tape that is beige. The wide tape allows for good coverage both on the paper (at least one-half inch of tape should cover the edges of your paper) and on the board. Good taping will result in a nice, finished painting that dry very flat. The taped edge also provides a nice gripping area when working with large wet washes.

Thursday, October 22, 2009

Candy Dish Lesson 7


Time to paint the shadows of the green candies. Again, working with the theory of relative opposites on your palette, look at a color wheel, and see which color on your palette might work as a nice, transparent opposite for the green candies.

I chose Permanent Alizarin Crimson, since it is already a color I am using in this painting, it will keep the look "cohesive". Using the same technique from the previous two days, I painted the shadows of the green candies with the red under-painting. Look for areas where a crisp edge is appropriate and where you may need to soften an edge with a clean, damp brush. Be sure that your shadow areas make sense with the direction of your light source. This will not only make your painting look dimensional, but it will make it look believable! Allow to dry, then glaze each of these candies with Permanent Sap Green. Be sure to keep the glaze wet, transparent and don't over-brush!

Wednesday, October 21, 2009

Candy Dish Lesson 6


Using the same technique as yesterday, I am painting the shadows for the "Yellow" candies. Because I don't want the candies to turn strange colors, I am glazing the yellow candy shadows with a bit of Burnt Sienna. I am again trying to pay attention to the crisp and soft edges, wetting the edges where I don't want crisp lines. If you would like a more dramatic effect, use a mixture of French Ultramarine Blue and Permanent Alizarin Crimson, very wet, to make a light purple color for the shadows of the yellow candies. Allow these painted shadow areas to dry.

After the shadows are dry, apply a nice, bright, wet glaze of Aureolin Yellow. Cover the shadow areas and the entire yellow candy. If you like, you can drop in a little New Gamboge here and there with a wet-in-wet technique.

Monday, October 5, 2009

Still Life With Cherries Lesson 15

Now it is time to step back and take a good look at this painting. I want to be sure I am not overworking some areas. I like to keep the painting at the same stage of development throughout.
As I study this piece I can see that I can add some darker values to the jar. I painted some of the warm colors used earlier in to the details of the lettering on the jar, saving the whites for where the light is hitting it directly. I added some Prussian Blue to some of the darker shadow areas around the piece including the bottom edge of the white dish.
It's starting to come together!

Friday, September 11, 2009

Boat On River Lesson 7

Today I have applied a bit of very wet Burnt Sienna to the dock area. As you can see from the progress so far, I like to work around the whole painting a little at a time. I find this helps me to keep a check on values and color, and I don’t get stuck in one area. I work in simple, under-painting, or foundational washes, then slowly work into details later. The under-painting really helps me to keep from over-working a piece and I don’t have areas that look like they don’t belong because they were developed too far before the rest of the piece.

I love to hear from you! Please feel free to share a comment or become a Follower!