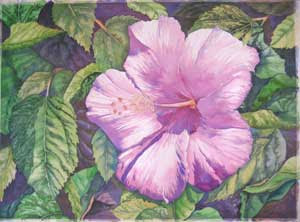
Buffy took my online class to paint the Hibiscus! She did a beautiful job.
Thanks so much, Buffy, for sharing your end result!
You can paint along online as well. Follow the link to the previous blog entry and enjoy! For $5.00 you can receive the photo reference and drawing if you would like it.
Here is the link to the beginning of the Hibiscus lesson.
http://watercolorworksart.blogspot.com/2009/04/hibiscus-lesson-number-1.html
Tuesday, April 28, 2009
Monday, April 27, 2009
Melbourne Art Festival
I had a booth at the Melbourne Art Festival in historic downtown Melbourne, Florida this past weekend. While at the show I worked on a few paintings and I was able to complete this one, which I have named Beach Play Two.
I saw these little girls on the beach a few weeks ago and took some photos. I thought they were just so cute I had to paint them. I had a lot of fun adding colors to the wash of water on the sand.
Friday, April 24, 2009
Cabbage Patch in Watercolor
I started this piece while still in Michigan last fall. I took the reference photos when I visited my daughter in Moscow, Idaho! I loved the repetition of curved shapes and the splashed of pink and purple in the leaves. I put this one down several times and returned to it over and over again. I finally finished it in March of 2009. It is currently at the Art and Antiques Studio Gallery on Highland Avenue in the Eau Gallie Art District of Melbourne, Florida.
It has been a very busy week. We had a great show in Vero Beach last week, which has caused me to take lots of time to paint this week to catch up my inventory for this weekend. We will be at the Melbourne Art Festival all weekend. It should be a great show, due to the fact that there are a great many talented artists in this area. If I can get them framed, I will have several of my newest pieces, including the Pink Hibiscus and the latest beach painting from my last post, which I have called Day Break.
If you are in the area, please stop by my booth and say hello! Due to the work preparing for the recent shows I haven't been able to get any new online lessons prepared. I promise to have some in May, so stay tuned!
Thursday, April 23, 2009
Student Work: Level 1 Watercolor Class
My Tuesday morning watercolor class has been working on mastering some brush strokes that create both crisp and soft edges. For this project we worked on morning glories from a photo reference that I brought in.
Ruth, Mike and Judy all have worked hard and the results are really beautiful paintings.
My snowbirds are leaving for the summer, so they will finish their pieces when they get home, but I am confident they will turn out great!
Nice work, guys!
Ruth, Mike and Judy all have worked hard and the results are really beautiful paintings.
My snowbirds are leaving for the summer, so they will finish their pieces when they get home, but I am confident they will turn out great!
Nice work, guys!
Monday, April 20, 2009
My Latest Beach Painting
I usually paint at the street fairs I attend. We were at a show this past weekend in Vero Beach, Florida, and I worked on two pieces. I completed this one last night here at home and I wanted to share it.
I call it Day Break. The photos were taken at sunrise on the beach at Indiatlantic, a small town about seven miles from us. I started the piece with my Friday morning Level Two watercolor class. We worked on it for three Fridays, and then decided to complete it at home. I put in about three hours or more after the last class. We'll start a new project this Friday.
This was a fairly organic piece, meaning we just started laying in washes without doing much drawing ahead of time. Our reference photo was pretty dark, and it didn't have the drama in the sky that we ended up with in the painting. Because it was not very restricted by the reference photo, each student's piece was very different.
Here are three of my students with their work. Buffy, Irene and Mike - each piece was really lovely. They all had slightly different compositions, and used their brushwork and colors to fit their own personal styles. They really did a beautiful job!
Friday, April 17, 2009
Water Lily Painting
This piece was painted from photos that I took at my brother's lake house.
You can see this and many new pieces at the Hibiscus Festival in Vero Beach, Florida this weekend.
For more information on the festival
go the events page on my website http://watercolorworksart.com/events.htm, and then click on the Hibiscus Festival.
You can see this and many new pieces at the Hibiscus Festival in Vero Beach, Florida this weekend.
For more information on the festival
go the events page on my website http://watercolorworksart.com/events.htm, and then click on the Hibiscus Festival.
Thursday, April 16, 2009
New Painting - Flamingo Nap
Flamingo Nap is a piece that just happened while I was playing with my paints about a week ago. My daughter and my best friend came to visit a few weeks back and we visited the Brevard County Zoo. They have some beautiful flamingos there and I took several photos of them napping at the edge of a pond.
As I was going through my photos, this one captured my eye and I started sketching with my watercolor pencils. After drawing the initial bird and some reflections with the watercolor pencils, I got out my palette and played with it some more. I am in the process of framing it, so it should be at one of my upcoming shows or at the Art and Antiques Gallery soon.
Monday, April 13, 2009
Hibiscus Lesson Number 12
I wasn't completely happy yet. The background looked too cool for the backdrop to this pink hibiscus. I decided to add an over all glaze of Aureolin Yellow to the entire background.
The glaze was 90 percent water and 10 percent pigment, meaning very, very faint and wet. This subtle glaze was just what I needed. The glaze warmed up the background and unified it. It is amazing what one wash can do to tie a painting together.
The final painting. Hope you enjoyed this one!
Visit back soon, and your comments are welcome!
To see the entire process, please visit the previous posts.
Sunday, April 12, 2009
Hibiscus Lesson Number 11
At this stage of the painting I work around the image to add final details. At right is a detailed view of the leaf on the left side of the painting.
I used the same colors that I used previously to keep the painting uniform: VanDyke Brown, French Ultramarine Blue, Hooker's Green, Sap Green, and Burnt Sienna.
If you would like to learn about my classes, please visit my website:
http://watercolorworksart.com/Classes
You can paint along with my blog, too! For $5.00 you can receive the drawing and photo references for the paintings here on my blog and paint along. To get your references, visit my etsy shop. Let me know which Lesson you would like the references for and I will email them to you once your payment has cleared.
Saturday, April 11, 2009
Hibiscus Lesson Number 10
Ah, time to remove masking.
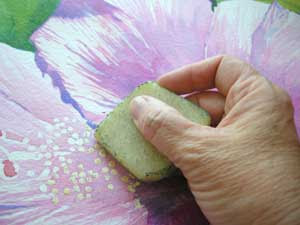
I used a Masking Fluid Pickup tool to scrub off the masking fluid and regain the white areas underneath.
Using a variety of the reds and yellows on my palette, and a number six round brush with a good point, I developed the details in the center of the flower.
I glazed several times over these tiny areas, but I also painted around some of the whites, so that the focal point could really sparkle.
Friday, April 10, 2009
Hibiscus Lesson Number 9
Here I have glazed the flower with Quinicridone Magenta, being sure to keep a lot of the whites. This wash was applied with a very weak stain. I didn't want to make the flower darker, I just wanted to warm up the tones so they weren't so orange, but rather more pink.
Various washes of Burnt Sienna and VanDyke Brown were used over the blue areas in dark background. I tried to use them in dark and light applications, with lots of water, to keep the edges soft.
I also applied more French Ultramarine Blue, Sap Green and Hooker's Green in details of leaves to increase the texture of some, and to catch others up in detail.
Thursday, April 9, 2009
Hibiscus Lesson Number 8
Sap Green, Aureolin Yellow, and New Gamboge combinations are used in light glazes to enhance the leaves. Glazing over the blue underpainting begins to soften the blue into simple, visual shadows of the top glaze of color. This glazing helps to unify the piece as well.
I have added some Burnt Sienna here and there in the background where stems appear and in very thin glazes on some of the leaves. This adds a bit of warmth to the entire area that surrounds the wildly warm flower.
I have also added another very light, watery glaze of Winsor Red to the flower head. I didn't cover every area, only those areas that needed a splash of warmth, especially in the shadowed areas.
Wednesday, April 8, 2009
Hibiscus Lesson Number 7
Continuing with the Hibiscus lesson. If you would like to see the previous posts, just visit them here on my blog!
The leaves: I used Permanent Sap Green and Hooker's Green to develop some of the initial glazes in the leaves. By using varying strengths of color and different colors I have created a variety of underglazes for building the next layers of color.
The variations help to provide luminosity and keep the piece from becoming stagnant, and boring. The different colors of cool and warm greens also help to pull some leaves visually forward and others draw back.
I added a glaze of Permanent Rose to the flower head, preserving a few white areas here and there. I added some Winsor Red to the pollen on the flower.
Tuesday, April 7, 2009
Hibiscus Lesson Number 6
Today I am using French Ultramarine Blue and a bit of Ultramarine Violet to create the deep shadow underpainting for the background. I just applied very wet paint in varying values to create the foundation for the deep colors I want.
I am also using the French Ultramarine Blue to develop some of the initial details and shading in leaves. The subtle areas of light and dark with crisp and soft edges replicate what I see in the reference photos. I am not painting exactly what I see, but I am searching to create the "look" of the texture of the leaves. To develop these areas I apply a stroke of fairly strong color, very wet with a number six round brush. Then, quickly clean my brush, tamp it on my toweling next to my palette and touch the wet pigment on one side with the damp brush. This softens the edge. Then I dip the brush in clean water, drain a little off on the towel or the edge of my water container so that the brush is not dripping. I use this liquid, starting in the clear, dry, paint-free area, and pull the water into the pigment. This softens the edge, draws the pigment out a little, but the outer edge is only clear water, so it will dry without a line.
You can see the effect of the yellow underpainting on the leaves. It took several hours to work around the painting in this manner.
Monday, April 6, 2009
Hibiscus Lesson Number 5
Sunday, April 5, 2009
Hibiscus Lesson Number 4
Continuing on with the Hibiscus Lesson that I have been posting. Now I have mixed a puddle of Quinicridone Magenta and Ultramarine Violet.
I used varying mixtures of these two colors back and forth and I used my Number 10 Round brush to paint in the first wash of the flower head.
The wetter, more magenta washes were used to create the softer, higher value tones. The more violet mixture was used to create the shadowed areas.
To develop the darker detailed areas, I added some French Ultramarine blue. I held my brush straight up and down and barely touched the tip of the brush to the paper, so that as I pulled the pigment along, it would create lovely, delicate linework.
Saturday, April 4, 2009
Hibiscus Lesson Number 3
Time to mix up a puddle of Aureolin Yellow. Apply this wash to any areas that will catch the light in your piece. I focused on the highlighted areas of the leaves. Vary your edges and values to add interest and depth to this underpainting glaze. The flower should be all warm, red and pink tones, so don't add yellow here. We'll save the flower for pinks. If you add yellow to the flower the next layers will turn orange.
If you would like to see the initial stages of this painting, please visit the previous postings.
Friday, April 3, 2009
Hibiscus Lesson Number 2
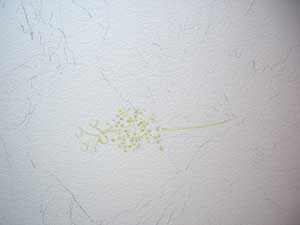
Even though the drawing is on the watercolor paper now, there is still another step before paint is applied to this piece. I wanted to mask the bright little areas near the center of this flower. If I mask these areas, they will be preserved and I don't have to be quite as careful when laying down the first few washes.
To mask, I use a small container that holds a bar of soap and some water. You can use dish soap also, but I like the bar of soap because it is a little thicker. My second small container holds a tiny bit of masking, just enough for the current project. This protects my fragile masking fluid in its larger container. Masking dries out quickly, so I like to keep my larger container closed, except for pouring a small amount into my little container that I work from.
I use a small, cheap brush. Don't ever mix masking fluid or its water, with your watercolor paints or brushes. Any masking that gets into your water tub can eventually get into your good brushes and ruin them forever.
I saturate the brush with the soapy mixture by brushing into the very wet, thick bar of gooey soap. Then, I dip into the masking and apply a small amount at a time. Again, dip into the soapy mixture, pick up a little more masking and apply. The soap keeps your brush from getting saturated with masking fluid. The brush will stay soft and workable for a long time. The last thing I do is scrub the brush in the soapy mixture one last time. I don't wash out the brush, I just leave the soapy mixture in it. My masking brushes last a long time!
Allow the masking to air dry. If you dry it with a hair dryer, the heat can make the masking sink into the paper and it will be more difficult to remove.
Thursday, April 2, 2009
Hibiscus Lesson Number 1
Okay, better late than never. I put my back out this past week, so I am slow to getting this lesson posted. I am much better now, but I apologize for the delay.
The first stage of this painting was to create a drawing from a reference photo that I took at a local nursery. I moved some of the leaves around to help draw the eye around the painting and to enhance what I wanted to be the focal point, the hibiscus.
After creating the drawing, I enlarged it on my computer and printed it out on sheets of paper, which I taped together with clear tape. The drawing is now the size of a full sheet of watercolor paper.
Then I scrubbed the back of the enlarged drawing with a Chunky Graphite Stick (can be purchased at CheapJoes.com). It's important to scrub hard and deposit a lot of graphite on the paper, so when the drawing is traced onto the watercolor paper, almost no pressure is required. This will prevent indentations in your paper from pressing too hard. These depressions can collect pigment and create ugly marks and lines in your painting.
I tape the drawing in a few places along one edge to create a sort of hinge. Now I can trace the image onto my watercolor paper, and lift the drawing occasionally to view my progress. Again, when tracing, use a light touch!!!
Remove your drawing and fold it in half. You may want to use it again sometime!
If you would like to join us in painting this piece, for $5.00 you can order the printable reference files from my etsy shop: www.watercolorgirl.etsy.com.
Wednesday, April 1, 2009
Buffy's Painting
Buffy is one of my Level 2 student's here in Melbourne, Florida. I wanted to show off one of the paintings she brought in. I think she did a wonderful job.
She is working hard to implement the techniques we are working on in class. I think she is mastering the washes beautifully, and I really think her composition is a nice one!
Great Job, Buffy!!!
She is working hard to implement the techniques we are working on in class. I think she is mastering the washes beautifully, and I really think her composition is a nice one!
Great Job, Buffy!!!
Subscribe to:
Posts (Atom)