Wednesday, June 22, 2011

Annuals - Completed

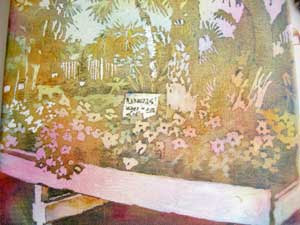
Ah, the finished painting.

Once this little guy was completely dry, I took it outside and applied four or five very thin coats of Clear UV safe spray varnish.

You can see that I glazed a lot of color and darker values onto this piece, but the first two layers just glow through!

This piece will be posted for sale on the Art and Antiques Art of Eights Project web page.

I love hearing from you!

Thanks!

Tuesday, June 21, 2011

Annual Watercolor on Canvas Final Stages

Now for the big "reveal"!
I use a masking fluid pickup tool to lift the dried masking. It is a great little tool, inexpensive and very clean and efficient.

I took the mask off this piece after only two layers because I didn't want to go too dark too fast. I wanted to see what had transpired and then go from there.

As you can see, the values are still a bit light. I love to have strong value contrasts from very light to very dark as this adds lots of drama to the painting.


I can still see a small bit of the graphite I applied, so I know where I want to add some darker glazes.

I used a variety of colors from my palette and glazed on white a few layers in small areas using a number six round natural hair brush.

Be sure not too scrub your layers on, just gently float them on. If you scrub, the canvas has a tendency to let go of the color previously applied. This is good if you don't like an area. With canvas you can lift all the way back to the white quite easily, but I didn't want to lift on this painting. I was happy with what was there - it just needed some punch.
Stay tuned, the big reveal will be in my next post!

Monday, June 20, 2011

Annuals - Watercolor on Canvas Technique

The first application of paint!
This is such a blast! I use a large, soft bristled brush to gently float water over the entire canvas. Have lots of paper toweling on hand as this gets very drippy and messy.

I use three colors that relate to the primary colors: New Gamboge, Quinacridone Magenta, and French Ultramarine Blue. These are just my go-to colors. They seem to work so well and blend nicely.

I dribble the wet pigment into the water on the canvas, and allow it to flow and blend. Don't tip the canvas too much or you will create a solid color or just mud. Notice that I apply the colors somewhat carefully, adding the blues to where I will develop darker values and lighter, wetter, warmer dribbles into areas that need to remain lighter.

Allow this to dry thoroughly. Then apply masking to the next darker value (value number two). Just remember that the masking saves the lighter areas. Your whites are already saved, now save the next darker color. Do the same for each application until you get to the darkest darks.
Apply the next layer of paint in the same manner as the first, but use stronger pigment with each application. You can also switch to a different color trio if you like.

I use a small spritzer to control the wetness and flow of the colors. I can also use it to "wash" off color that is too dark or the wrong color. To blend the pigment use a very light spritz, to wash color use a more forceful direct spray. Be sure to allow the color to drip over the sides of the canvas. I love to work on gallery wrapped canvas because the pigment flows onto the sides and creates lovely patterns. I don't have to frame it when I'm done, either!

Sunday, June 19, 2011

Annuals - Next Step

Okay, back to the Annuals painting...
values with a graphite pencil. With each layer of paint much of this graphite will lift off, so I pencilBecause I will be using lots of water and very wet pigments on this piece I gently scrub in my darkest in quite a bit to see where I am going.


You can see I use quite a bit of pencil so that I will have graphite left after each application of paint to help me navigate my way through to the end.

Just be sure you don't push too hard with your pencil. Use a soft lead so that you can deposit a good amount of graphite without damaging the canvas or scratching through your absorbent ground.
You can mask either before or after this step to save the whites (value number one).

Saturday, June 18, 2011

Watercolor on Canvas - Annuals

As promised, I took some process photos of this project so you can see how I work.

This is an 8 by 8 inch canvas which I painted for the Art of Eights Project through Art and Antique Studio and Gallery (http://artandantiquestudo.com/Artof EightsImages.htm).

I used Golden White Absorbent Ground mixed with water (1 part ground, 2 parts water). I applied this mixture onto my canvas in 4 to 5 very thin applications, allowing each application to dry thoroughly before I added the next.

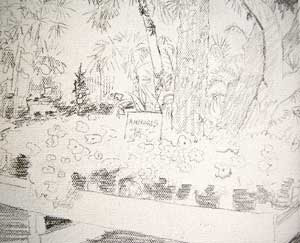
Once all the ground was applied and dried, I created a pencil sketch of my subject. This piece was created from a scene in the Eau Gallie Arts District in a beautiful garden center.


My next step is to apply masking fluid to any area that I want to remain white. There are only a few small areas in this piece, so the masking went very quickly.

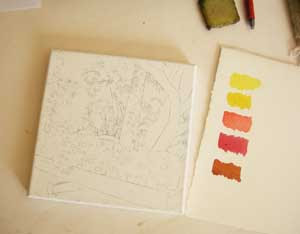
I also tested some quinacridone colors to see which might look nice in this piece.

More to come...stay tuned.

Thursday, June 9, 2011

Preparing a Canvas for Watercolor

I have been asked often how to prepare a canvas to make it work with my watercolor and layering technique.

Golden makes a product called Absorbent Ground. I use White Absorbent Ground, mixed with one part ground and 2 parts water as a gesso on my canvas. It's important to use this mixture over any canvas before painting with watercolor. I like to purchase the pre-gessoed canvas then apply my ground mixture before I paint. I apply 4 - 5 very thin coats evenly over the entire canvas. Allow each coat to dry thoroughly before applying the next. This creates a beautiful, sturdy surface to work on with watercolor. It takes quite a bit of abuse and handles the masking and layering of pigments well also.
The most fun part of working with watercolor on canvas is that I can lift it completely if I choose. Use a wet brush and scrub the surface, then dab with a paper towel or dry cloth. It's a fun surface and has lots of potential.
Once your painting is complete, spray a clear UV coating over the canvas to waterproof it and protect it. I love to work with gallery wrapped canvases so that I don't have to worry about framing!
I am starting a new small canvas today. I'll try to post photos soon.
Here is one that I finished and sold recently. It is called "Eau Gallie Market".
Hope you enjoy it and let me know if you try watercolor on canvas!

Saturday, June 4, 2011

Shore Spectacle, Pelican in Watercolor

This guy was challenging and fun. Here in Florida there are lots of pelicans and this guy posed perfectly for me. I worked on this piece for quite a while. When I removed the masking, the values in the water and the bird were too similar, so I glazed the water with a very wet, thin wash of French Ultramarine Blue to cool it down. It worked. The happy bird suddenly popped off the page. I was very happy with the result on this one.

For those who want to create these types of colors I used: New Gamboge, Quinacridone Magenta and French Ultramarine for the first pour/layer. Subsequent layers were created with combinations of these colors plus Quinacridone Gold, Permanent Alizarine Crimson, Pthalo Blue, and Burnt Sienna. The secret is to only pour with two or three colors at a time and to prevent the colors from blending too much (creating mud!). This means lots of layers, lots of drying time and lots of time to think about the next application of paint. My favorite thing about this technique is that I can create details and crisp lines with the masking fluid, yet keep the wet, gorgeous color blends with the layers of poured or very wet washes.

I hope you enjoy this one! And I love to hear from you. Please feel free to leave your comments!