Wednesday, June 30, 2010

Palm Tree Wet In Wet Technique

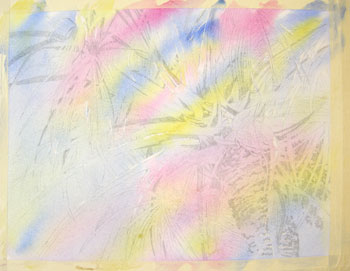
The masking has dried and here I am applying another wash. First I wet the paper with clean water. It's important to allow the water to soak in a little. This helps the pigments to flow nicely yet stay close to where you want them. I use three primary colors for the most part - blue, red, yellow.

When I apply the colors I just drop them into the areas where they would seem most appropriate. I don't brush them into each other, but lay them next to each other instead. Then I tip the paper to allow the colors to flow and blend.


When you work wet-in-wet, remember that you can apply the colors quite a bit more dark than you think. Because the paper is already diluted, the colors will dry quite a bit lighter than they appear when they are applied. Experimenting with this helps.

More to come soon...

Tuesday, June 29, 2010

Palm Tree Wet In Wet Technique

I have applied another wash. After this dries I will add more masking to save the next level of values! Lots of work, lots of patience, lots of results!!!

You can follow me on Facebook!
To learn more about my classes visit my website:
http://watercolorworksart.com/Classes.htm

Monday, June 28, 2010

Palm Tree Wet In Wet Technique

After the first wash dries completely - what I call "bone dry", I then mask the next light values to save. Here you can see the masking. It's okay to use masking tape, or frisket film, but I find that they leave funny edges when the masking is removed, so I stick with brushing on the masking fluid.
So the first masking was to save the absolute whites of the paper. This masking application is to save the value 2 areas. I use a value chart from one to six, one being white and six being black. Each number represents a paint application. So, each stage of the painting is masked to save the next layer of color and value.

Monday, June 21, 2010

First Mask and Wash on Palm

The first thing I did was to apply masking fluid to the absolute whites that I wanted to save. After the masking was completely dry I wet the paper gently with clear water and a 2 inch soft brush. I apply a lot of water so that it puddles on the paper. Then I tip the board back and forth to keep the liquid flowing in all directions so that the paper absorbs the water evenly.

Once the water has soaked into the paper, has lost most of the "puddle" and simply looks shiny, I add the three primary colors. I don't blend them with my brush, I simply drop then onto areas of the paper, tipping the board, allowing gravity and the wetness of the paper and pigments to softly blend the edges. I want to keep this relatively light as these colors will represent the second lightest values in my painting. They will also act as underpainting for the next few washes. This will dry quite a bit lighter than it looks when applied.

Now this has to dry completely - bone dry - before I can work on it again.
More to come....

Slowly But Surely...watercolor...

Slowly but surely I will get this posted.

Because I am using a very wet technique for this painting, and I will be using many layers of wet, blended colors, I don't have to worry about the graphite on my paper. Here I have penciled in lightly, with a number two drawing pencil, the darkest values of my painting. As I add the wet colors the pencil lines will lift and lighten. I don't want to lose my value pattern, so I add the darkest as they will be the last to be added in. If I were using a direct painting method I would be much more careful about the pencil marks. Even with this method, though, I don't want to press hard with the pencil. That would leave impressions on the paper that would cause the pigment to sink in, leaving unsightly marks.
More to come...

Saturday, June 12, 2010

Palm Tree Wet In Wet Technique

Okay, I finally have a few progress photos of the palm tree to show you. You can see my sketch book on the right, my reference photo at the top, my masking fluid on the top right, and a small pencil. At this point I have created a drawing in my sketchbook. I then trace the loose sketch create a value study in only three or four values. I do this with a set of black and gray markers. I use the white of the paper to indicate the lightest values.


This value study will help me to determine where to mask areas before color is added.


These preparatory steps take some time, but the extra time is worth it with the beautiful end results that I can achieve!

Once I have these steps completed I enlarge the value study and use graphite to trace it onto my full sheet of watercolor paper.

Because I will be painting very wet, I use two inch masking tape to secure my paper to a foam core board. This will help to keep it relatively flat while painting and it will pull it flat again as it dries.

More to come soon on this painting...