This piece, Pink Hibiscus, will be the next lesson here on my blog. If you would like to paint along, please visit my etsy shop (http://watercolorgirl.etsy.com). Click on the icon for the Online Class. For $5.00 I will send you a pdf of the drawing and photo reference. Then, you can visit back on a daily basis, or whatever is convenient for you, to paint along!
This piece was painted on a full sheet of watercolor paper, 23 x 30 inches, but you can also paint it smaller, if you like. The reference will be sent in a small format, which you may enlarge to full size.
Hope you can join us.
Thursday, March 26, 2009
Monday, March 23, 2009
Palm Tree on Indian River Lesson 9
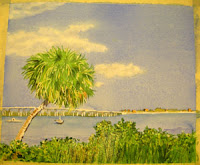
The final painting.
This was a fun piece. I hope you enjoyed it. Stay tuned as I will be posting a new lesson soon! If you would like to work along with a lesson that was posted in the past please email me. Let me know which lesson, then you can order the reference materials via my etsy shop.
To see more of my completed work, please visit my website:
http://watercolorworksart.com
To purchase prints you can visit one of the many galleries in Michigan, Ohio and Florida that carry my work, see my website for details.
To take a class locally visit: http://watercolorworksart.com/Classes.
Thanks for visiting!
Sunday, March 22, 2009
Palm Tree on Indian River Lesson 8
Now I will work on the clouds!
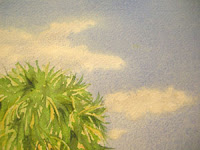
I used a very clean, wet, number six round brush with very soft bristles. Making a small circular motion, I lifted and softened the edges with a very light touch. I used a paper towel to gently lift the wetted area. I used the same technique, only with more pressure, to lift the whiter, lighter areas of the clouds. When working on this section, note that clouds have a light and dark side, especially if they are somewhat thick and billowy. The edges should be rounded, soft and irregular. Let the painting lead you.
Don't overwork this stage, just stand back and see where you think the cloud should be lighter, here and there. If you have clouds in the sky today, take a close look at them. Notice where the lights and shadows are. Notice how the shapes look. Clouds are very forgiving and fun to paint because you can make them up as you go.
When this is dry, mix a tiny bit of French Ultramarine Blue and Burnt Sienna in wash that is about 90 percent water and 10 percent (or less) pigment. With your number six round brush, apply a tiny bit of this mixture to shadow areas of the cloud and immediately clean your brush and soften the edges of the wash with a damp, not wet, brush. Be careful not to apply shadows that are too dark or too uniform. Clouds don't really have sharp edges, so to make yours believable, you have to have subtle edges, shapes and values.
Evaluate your work.
Hold it up in a mirror to see it with a fresh eye. If you have overworked any areas you can do some softening and lifting. During my evaluation of this painting, I felt that I had over worked the foreground, which took away from what I wanted to be my focal point (the boats and palm tree). I mixed a very wet, pale wash of Sap Green and Burnt Sienna and washed it over the foreground, making sure I used very little pressure on my brush and not stroking the area more than once. I used a number 16 round brush to keep from over working and blending too much. I liked the softening effect this had on the area. I still had some texture and value changes, but it was less focused and thus brought the eye back to the palm tree.
Saturday, March 21, 2009
Palm Tree on Indian River Lesson 7
Here I used Van Dyke Brown to add some detail to the trunk of the tree, and to work in shadow areas around the painting. I used it to glaze over the blue shadows that I applied in the last glaze. This warms them up and deepens the value even more. Just applying the same color will only make the paint thick, it won't make it darker. To increase the value of a color, I use a color opposite in temperature as a glaze. For example, if I have used a blue for shadow areas, but I want the color to be darker than what I can produce with that blue, I will glaze over the blue with a warm color like Van Dyke Brown or Burnt Sienna. I works like magic!
At this stage I also worked around the painting to clarify values, clean up edges and to paint light value glazes over some of the harsh, masked areas of the tree and grasses. A wet, light value over these areas will soften the edges of the crisp, masked marks.
I used Burnt Sienna and Quinicridone Gold for the buildings, again, not putting in details, just basic shapes.
To see the beginning stages of this painting you can visit the previous posts for this blog.
Friday, March 20, 2009
Palm Tree on Indian River Lesson 6
I have used a Masking Fluid Pickup to remove all the masking. This tool is wonderful! It quickly and cleanly removes all of the masking without smearing or smudging your painting. You can purchase this tool at most art supplies stores, and also online at CheapJoes.com.
Using French Ultramarine Blue I have added some shadows to my palm tree trunk, and to the boats and bridge. Even though we are not painting the minute details of the bridge, the direction and value of the painting in the shadow areas is very important. Notice the little angle of the shadow on the pillars under the bridge. Also notice that the shadow directly under the roadway is a different value than the pillar shadows.
Use care when applying the shadows to the boats also. I try to pay attention to value (lightness and darkness) and shape. It helps to squint at your reference photo to see the values and shapes. When these elements are given attention, even a single, tiny brushstroke will make your element believable.
You can see more of my finished artwork at http://watercolorworksart.com.
Thursday, March 19, 2009
Palm Tree on Indian River Lesson 5
At this stage, if the masking is completely dry, I can begin to apply more green values to my palm tree and to the foreground. Some colors used were Hookers Green, Quinicridone Gold, New Gamboge and Earthen Green. Because I have used the masking, I can work very wet dropping in a variety of colors and allowing them to flow and intermingle. I dry the work with a hair dryer on the cool setting (to prevent the masking from baking into the grains of the paper). Then I mask areas where I want to save this stage of greens, golds and browns.
I continue with the masking and wash process until I am happy with the value range. Mask, dry, paint, dry, and repeat. For the final values on the green areas I used Perylene Green and VanDyke Brown. With a number 6 round brush, I added soft brush strokes to the very darkest, shadowy areas.
Finally, I added some Earthen Green to the tree line in the background. While this application was still moist, I softened the edge of the tree line with a clean, damp brush to take away the crispness. I want a soft edge along this area so that it appears that the atmosphere is softening the elements that are far away. Dry thoroughly.
Wednesday, March 18, 2009
Palm Tree on Indian River Lesson 4
For this stage, I used a very wet mixture of Permanent Sap Green and a little Aureolin Yellow to create a lemon yellow wash for the first glaze on the trees and greenery. I applied the paint VERY WET. To the puddle, I dropped in a little Burnt Sienna here and there where the palm fronds will look more brown near the bottom of the tree. I also added a little Burnt Sienna, wet-in-wet, to some areas of the grasses in the foreground. I like to add this earthy color to my greens to keep them from being too garish. Usually in natural settings, you will see browns and golden colors within the greens. You can see how nicely the masking fluid is resisting the paint and holding the white areas. Allow to dry or dry with a hair dryer on the cool setting.
When this application is bone-dry, I apply more masking as I did in the number two lesson of this project. Do not apply masking to the damp or moist paper, as you will not be able to remove it and the lines created will not be crisp. I apply the masking to the next lightest value. For instance, the first application of masking was to protect the very lightest color of white. Now I am adding masking to protect this value of color that I just applied. I want to be frugal. If I add too much masking the painting will look contrived.
Look for the light values for this stage in the palm fronds and in the grassy areas in the foreground.
Visit previous posts to see the other stages of this painting in progress.
Tuesday, March 17, 2009
Palm Tree on Indian River Lesson 3
Now that the masking is dry, I can add big sloppy, wet washes to my painting and keep those delicate areas white. I did use some water over the bulk of the tree to create soft edges when I apply the washes for the sky.
I used French Ultramarine Blue, and a touch of Ultramarine Violet for the sky wash. I applied the paint very wet. Once I was happy with the color and value of the sky, I used a paper towel to gently lift some little clouds. This must be done while the wash is still very wet. I crumbled the paper towel to create oval and round shapes for lifting. The harder I press the more pigment was lifted. Then, I wrapped a little bit of toweling around my finger and gently touched the edges of the clouds to create uneven edges around the outer areas of the clouds. Some blue remained inside the clouds and I will use those areas later to create subtle shadows in the forms.
Next, I used French Ultramarine Blue and Antwerp Blue to add the first glaze or wash to the water area. In order to make the water look like it is receding into the background, and that it is relatively flat, the value (lightness and darkness) must be varied from front to back. Allow to dry or dry with a hair dryer.
If you would like to follow along with this lesson, please visit my etsy shop and purchase the reference materials by clicking on the Online Class icon. The cost for the drawing and reference photo is only $5.00. Click here for my etsy shop: http://watercolorgirl.etsy.com.
Monday, March 16, 2009
Palm Tree on Indian River Lesson 2
Masking Fluid on a Watercolor Painting:
Now that your drawing is on your watercolor paper, you can secure it to a foam core board with masking tape. Be sure to cover at least 1/2 inch of the paper all the way around. This will ensure that the paper will remain held by the tape while applying your wet washes. Watercolor paper, especially 140 lb paper, will buckle when wet, so the tape will prevent it from buckling too much and as the paper dries, the tape will secure it so that it will dry quite flat. This is a great help when trying to frame a painting!
I want to add masking to this project to keep the white of the paper, and to subsequently save some of the lighter values as I paint. (see previous post for the beginning of this project) Masking fluid is fragile and dries out quickly. To preserve the bulk of the masking fluid, I pour a tiny amount into a very small, resealable container. I keep the top on the larger container and only remove the top when pouring some masking into my smaller container. I also have another container with a chunk of a bar of soap and water (you can also use a concentrated dishwashing liquid). This is helpful in preserving your brush.
The third thing is a cheap brush with a fine point. Brushes used for masking should never be used for watercolors and visa versa. Masking is very hard on brushes, so cheap little brushes, brush handles, even toothpicks, are very useful for this application.
The Process:
The first thing in masking is to dip the brush in the soapy liquid. I like to use the bar of soap because it makes the soapy liquid very thick. I really dunk the brush in this solution and thoroughly coat it. Then, dip the soapy brush into the masking fluid and apply it thoughtfully to the painting. The masking fluid will resist the paint, and so it will save the whites and lights. Thoughtful brushwork here is crucial. Whatever marks you make with the masking will be on your painting. If you are careless or sloppy, the marks will not make sense when the masking is removed later in the painting.
Continue to dip the brush in the soapy liquid, then into the masking. Do not mix any of your tools or liquids with the tools or water used for your regular painting. Ever. Period! Masking will ruin your good watercolor brushes, and even if you get a little in your water container, it can then get into your paints and brushes and ruin them!!!
Again, I cannot emphasize enough, how important it is to use thoughtful brush strokes in the application of your masking. I masked some of the lightest areas of the palm tree, making sure the masking described the direction and character of the long palm fronds. I also added some to the green grasses and shrubs in the foreground, the bridge, the tiny building shapes at the right, and I covered the boat shapes in the water. Be frugal, we will add more masking later as we add a little color.
Allow the masking to air dry, if you use a hair dryer, it can "bake" the masking into the watercolor paper and make it difficult to remove in the last stage.
If you are local to the Melbourne, Florida area, you can find out more about my classes here in the area. Visit my website for more information: http://watercolorworksart.com/Classes.
Sunday, March 15, 2009
Palm Tree on Indian River Lesson 1
For the start of this lesson I wanted to show you how I transfer a drawing to my watercolor paper. I usually draw on a 8 x 10 or 9 x 11 sized drawing paper. Then, if the painting will be larger I have it enlarged to fit the watercolor sheet that I want to use. This piece will be transferred to a 10 x 14 inch Arches 140 lb. paper.
I scrub the back of the drawing with a Chunky graphite stick, which can be found at Cheap Joes (http://cheapjoes.com). I prefer the chunky graphite stick because it is huge, easy to scrub with, lasts forever and only costs about $2.00.
When scrubbing the graphite on the back of your drawing, be sure to do this on a hard surface. Use some elbow grease. The more graphite you can deposit onto the paper, the easier it will be to gently transfer/trace the drawing onto your watercolor paper.
Once the graphite is thickly applied to the back of the drawing, I gently rub it with a paper towel to remove any excess crumbs that could deposit themselves onto my paper. Then, I use masking tape to make a little hinge to hold the drawing in place. I also make a little pencil line from the drawing to the watercolor paper on two sides of one corner so that if I have to bring the drawing back to the watercolor paper for any reason, after removing it, I will have some marks to line it up against. The tape hinge keeps the drawing in place while I trace, but allows me to lift it so that I can see my progress.
You can use a pencil or a ball point pen to do the tracing. Be very gentle, though. If you press too hard you will make grooves in the watercolor paper and then, while painting, the pigment will settle into the grooves in an undesirable way.
If you would like to follow along with this lesson, please visit my etsy shop and purchase the reference materials by clicking on the Online Class icon. The cost for the drawing and reference photo is only $5.00. Click here for my etsy shop: http://watercolorgirl.etsy.com.
Friday, March 13, 2009
Student Work: Beginner's Workshop
I just wanted to share the smiles. Jane and Lynn recently took my Beginner's Watercolor Workshop. Here they are with the paintings they did during the day. Great job ladies!
To learn more about my local classes, visit my website: http://watercolorworksart.com/Classes. There are several classes to choose from, and we have a wonderful time. New series of classes begin the last week of March, 2009.
Palm Tree in Watercolor Blog Class
For those of you who may like to paint along with my blog, this piece, Palm Tree On Indian River, will be posted this weekend. For $5 you will receive the photo reference and the drawing via email. You can then follow along as we paint this picture together. The focus is going to be on how to do masking, and a short lesson on clouds.
To order your references, visit my etsy shop and choose the online class icon. Hope you can join us.
My Etsy Shop: http://watercolorgirl.etsy.com
To order your references, visit my etsy shop and choose the online class icon. Hope you can join us.
My Etsy Shop: http://watercolorgirl.etsy.com
Friday, March 6, 2009
Art and Antiques Cooperative Gallery
Just a little update on what is happening in my work life. I have become a member of a cooperative art gallery here in Melbourne in the Eau Gallie (pronounced oh-galley) Art District. The gallery is called, Art and Antiques. I will be going over this afternoon with my first paintings to be hung in the gallery, and I'll have a small assortment of limited edition prints, greeting cards and miniature fine art pins.
The Eau Gallie Art District, where several, very nice, small galleries exist, hold a gallery walk on the first Friday of every month. Each gallery has an opening with new art, music, wine and hors d'oeuvres. Sometimes there are live musicians playing in the street, and it is a very nice time! After the walk many folks enjoy eating dinner at one of the fine restaurants in the area.
If you are ever in Melbourne, Florida on the First Friday, come and see the beautiful artwork, enjoy a stroll in old Eau Gallie and say hello!
I have a few street fairs coming up in April. To stay tuned with where I will be please visit my website: http://watercolorworksart.com.
Wednesday, March 4, 2009
River Scene In Watercolor No.8
This is the final stage of this painting in progress.
Here is a detail of what the focal point looks like so far. I wanted to warm it up a little so I glazed some New Gamboge, very wet, over the area of the river bank, the greenery and the lily pads.
You can see how the glaze added warmth and life to the foreground and riverbank. Now it looks more like the sun is shining on it!
Below is the finished project!
If you enjoyed this project, there is more to come. Click on the link at left to become a Follower!
Thanks so much for visiting! Another project will be here soon.
Tuesday, March 3, 2009
River Scene In Watercolor No.7
Trees. I love to paint them! Here, I have used mixtures of many yellows and greens on my palette, and I have used a number 6 round brush with a fine point. I used the Brush Dance stroke on a small scale and carefully went over the tree areas to refine the leaves. This stage is fun and it can be very relaxing to just let your brush dance over the paper. I try to pay attention to the values created by the small clumps of leaves. Each clump has light, shadow, reflected light and various patterns throughout. I forget that these are clumps of leaves on branches, but I try to focus on the patterns and shapes.
I have also used the same colors to work on the details that appear in the focal area where the lily pads are. I add shadows and variations of colors and glazes to help the viewer understand what they are. I used the same colors to add shadow and texture to the reflections in the water.
Monday, March 2, 2009
River Scene In Watercolor No.6
To see how this painting began, please visit the last few postings.
Here is a detail of the lily pad area so far. This is where I want my focal point to be. To create the focal point I want to have the most detail, the most contrast of values and the most interesting shapes. This will draw the viewer's eye again and again, if I work the piece correctly.
Here I have added some color and a tiny bit more detail. I added Prussian Blue to the mixes on my palette at this point to create deeper values and enhance the glazes that already exist. I think it is important, when applying subsequent glazes, to allow some of the previous applications to show through. In other words, don't completely obliterate the previous layers when applying new glazes of detail. The tiny bits of under-glazes that show through will add sparkle and life to your work.
I have developed a booklet that I use to teach my workshop students how to paint trees. If you are interested, please visit my etsy shop (http://watercolorgirl.etsy.com) and you can purchase the booklet. I will either ship it to you, or if you have high-speed, I can send a pdf file of the booklet via email. Click here to visit my etsy shop.
Sunday, March 1, 2009
River Scene In Watercolor No.5
Here I have used some Burnt Sienna, Quinicridone Gold and some of the green mud on my palette to work along the bank of the river, add the lily pad shadows (not the pad's details) and to add a little more textured glazing in the water.
Using Perylene Green and Hooker's Green, I have added more detail work to the lily pads, the bank, the trees and the reflections in the water. At this stage, I also decided that the first application of French Ultramarine Blue in the trees was a bit overwhelming, so I used a synthetic brush to moisten and lift
(also using a paper towel to gently lift off the excess color). This softened and lightened the blue so that it is not so heavy and will be more transparent for subsequent layers.
To see the previous steps to this painting, please visit my last few postings.
Subscribe to:
Posts (Atom)